Search This Blog

Saturday, October 23, 2010

Microsoft Product Scout


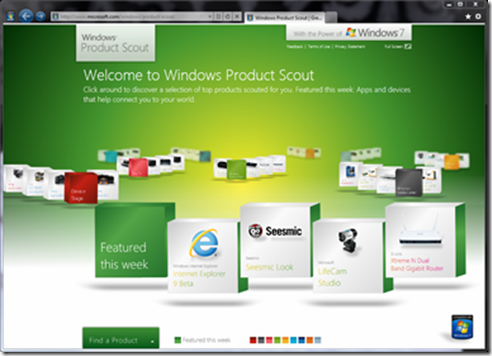
Microsoft has launched a service that helps users find Windows 7-enabled products. Windows Product Scout is a new destination on Windows.com that showcases a selection of products scouted by our team for Windows 7.  Every week, Microsoft will feature a new set of products on the home page and will be updating the site every month with more selected products.

image

Windows Product Scout focuses on products that have earned the “Compatible with Windows 7 Logo”.

image

These products have passed Microsoft designed tests for compatibility and reliability with Windows 7 including testing for common issues to minimize the number of crashes, hangs and reboots. The team also vetted products based on their experience and focused on products that support key features and technologies in Windows 7 – products that make it easy for you to get the very most out of Windows 7 (features like Windows Touch, Play To, Device Stage). We are also working with software developers and device manufacturers to build a pipeline of the new and exciting products coming in the near future.

A great experience: Windows Product Scout features an engaging user experience that groups products into “clusters”. It is simple to navigate with a mouse and is also touch-friendly. Microsoft have also implemented IE9 support so the site can be a pinned app with jumplist support.

Access to the products: Windows Product Scout gives you easy access to information about the products and how to get them. For every app, Microsoft offer a direct download link from the 3rd party publisher. In one click, you are ready to start your free trial or access a free version of the application. For devices, Microsoft offer a link to purchase the product either directly from the manufacturer or the Microsoft Store. The site also features editorial content from the Windows Blog & CNET about the products.

image

Discovering what you can do with Windows: The site gives you an easy way to discover a sample of products that support Windows 7 features. You can also click on the category cubes to learn more about specific technologies like Windows Touch, Play To, and others.

image

For now, please take a look at Windows Product Scout and enjoy the choice.

P.S. Use IE9 Beta for best experience of the website

Source: http://windowsteamblog.com/windows/b/bloggingwindows/archive/2010/10/20/introducing-windows-product-scout.aspx

Download Desktop backgrounds (wallpapers) from Microsoft


         Microsoft Offers a wide range of Desktop wallpapers for free of cost with few categories like Animal, fish, Bugs, Art, Entertainment and much more. Visit their website to Download those great Wallpapers. Just click on Get it now to Download their Wallpapers.

image 

Remember the warning from Microsoft:

These desktop background (wallpaper) images contain the intellectual property of Microsoft and other third parties. They are offered for download solely for your own personal use. Any other use, including the redistribution of the desktop backgrounds, or any other conduct in contravention of the applicable Terms of Use or Microsoft Software License Terms, is prohibited.

Just be sure before you share it !

Desktop backgrounds (wallpapers) - Microsoft Windows

Scariest Windows 7 Theme Yet: Eerie Autumn


Microsoft has certainly produced a wide variety of themes for Windows 7, featuring anything from cute puppies and kittens, to exotic landscapes, cartoons, and super-cars, but the company is now offering the scariest theme pack for the operating system yet.

Eerie Autumn is now available for download from the Windows Personalization Gallery, offered free of charge, just as all the themes featured on the site.

Screenshots:

image

image

image

image


Download: Eerie Autumn

Lightning Windows 7 Theme


The Windows 7 Lightning theme is up for grabs via the Windows Personalization Gallery, where, along with a plethora of additional themes, it is offered free of charge.

As the theme’s official label implies, the theme contains a collection of imagery depicting lightening.

By downloading and installing the content on their Windows 7 computers, users will have the chance of putting some breathtaking wallpapers depicting this beautiful but deadly natural phenomenon as background images.

You can almost hear the thunder boom along with the electrifying lightning images contained in this Windows 7 theme.

A beautiful themepack created by Microsoft to remind you of those dark nights with the cold rain pouring outside and rain drops hitting the windows' glass.

Screenshots:

image


image

image

Download: Lightning Windows 7 Theme

Windows Seven File Replacer


image

System modders need to take ownership of a system file before it can be replaced..
To make this process a little less time consuming I wrote a small program that does these tasks for you...
This program will, backup the OLD file, save the ownerships,
take Admin Ownerships and replace it with the NEW dragged or manually selected system file
to finally restore the ownerships back to how they were found.
It does this in just a few seconds!

Normally when a file is replaced the file's ownerships are changed and the "TrustedInstallers" will be gone.
However, the Se7en File Replacer will save all file permissions of the file before replacing it
and after replacement restores them back to how the Replacer found them!!
(even TrustedInstallers if the file had them to begin with)

image

The Replacer will first look in the "system32" folder for a match with your NEW dragged file,
if the OLD file is found it will be backed up and replaced without prompt,
otherwise you will be asked to select it manually in a file open dialog box.

(note for x64 users: please don't drag SysWOW64 files as they will be placed in the system32 folder, use the manual function instead!) The manual option will let the user select a new file first and then select the old file which needs to be replaced.
With this function any file in any location can be replaced.

the option to restore the "TrustedInstaller" ownership of a system file.
Please only use this on a file if u know it originally had the "Trusted Installer" permissions.

It's just an .exe and nothing will be installed.
I've added some extra option like:
"clear icon cache" to refresh your icons
and a "sfc /scanfile" option to select and restore a single file via the Windows File Protection service in an easy way.

WARNING: Use is at your own risk!
This tool is to replace un-owned system files.
Be careful not to use this if you don't know what you are doing..
This can and will break the system if corrupted system files are used to be replaced!

Download: Se7en File Replacer v1.5.4

BCDEdit Advance Configuration Explained


The Bcdedit.exe command-line tool modifies the boot configuration data store. The boot configuration data store contains boot configuration parameters and controls how the operating system is booted. These parameters were previously in the Boot.ini file (in BIOS-based operating systems) or in the nonvolatile RAM entries (in Extensible Firmware Interface-based operating systems). You can use Bcdedit.exe to add, delete, edit, and append entries in the boot configuration data store.


Commands that operate on a store

/createstore: Creates a new and empty boot configuration data store.

/export: Exports the contents of the system store to a file. This file can be used later to restore the state of the system store.

/import: Restores the state of the system store using a backup file created with the /export command.

/sysstore: Sets the system store device (only affects EFI systems, does not persist across reboots, and is only used in cases where the system store device is ambiguous).

Commands that operate on entries in a store

/copy : Makes copies of entries in the store.

/create : Creates new entries in the store.

/delete: Deletes entries from the store.

/mirror: Creates mirror of entries in the store.

Commands that operate on entry options

/deletevalue: Deletes entry options from the store.

/set: Sets entry option values in the store.

Run bcdedit /? TYPES for a list of datatypes used by these commands.

Run bcdedit /? FORMATS for a list of valid data formats.

Commands that control output

/enum: Lists entries in the store.

/v : Command-line option that displays entry identifiers in full, rather than using names for well-known identifiers. Use /v by itself as a command to display entry identifiers in full for the ACTIVE type.

Running "bcdedit" by itself is equivalent to running "bcdedit /enum ACTIVE".

Commands that control the boot manager

/bootsequence: Sets the one-time boot sequence for the boot manager.

/default: Sets the default entry that the boot manager will use.

/displayorder : Sets the order in which the boot manager displays the multiboot menu.

/timeout: Sets the boot manager time-out value.

/toolsdisplayorder: Sets the order in which the boot manager displays the tools menu.

Commands that control Emergency Management Services for a boot application

/bootems : Enables or disables Emergency Management Services for a boot application.

/ems : Enables or disables Emergency Management Services for an operating system entry.

/emssettings: Sets the global Emergency Management Services parameters.

Command that control debugging

/bootdebug : Enables or disables boot debugging for a boot application.

/dbgsettings: Sets the global debugger parameters.

/debug: Enables or disables kernel debugging for an operating system entry.

/hypervisorsettings: Sets the hypervisor parameters.

Note: Before you play with BCDEdit make sure you have made a proper backup

Backup BCDEdit:

To make a backup of your current BCD registry, call the BCDEdit /export command, as shown here.

Start under search type in CMD. Right Click and Run as administrator.

bcdedit /export backupbcd.bcd


Restore BCDEdit:

Start under search type in CMD. Right Click and Run as administrator.

bcdedit /import backupbcd.bcd


How to run the Command

Start under search type in CMD. Right Click and Run as administrator.

Type in bcdedit /enum all

This will show you all Startup entries. Likewise you could run other command to view and modify the boot settings.

How to Change the Default Operating System Entry

First we have to view the current Boot Configuration

Start under search type in CMD. Right Click and Run as administrator.

bcdedit /enum {bootmgr}

clip_image001

Then

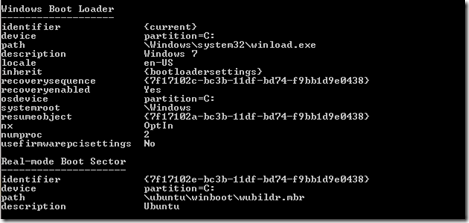
First run the below command to view the current entry

Start under search type in CMD. Right Click and Run as administrator.

bcdedit /enum
clip_image002

To change the Boot entry type in the following command

bcdedit /default {new entry}

For example: bcdedit /default {7f17102e-bc3b-11df-bd74-f9bb1d9e0438}

Once you do that run the follow command to see the current Boot entry

bcdedit /default {current}


To Change the Time out Values

Start under search type in CMD. Right Click and Run as administrator.

Then type in bcdedit /timeout 3


How to Change the Order of Boot Manager

Start under search type in CMD. Right Click and Run as administrator.

bcdedit /display {current} {7f17102e-bc3b-11df-bd74-f9bb1d9e0438}


How to Remove a Boot Entry

Start under search type in CMD. Right Click and Run as administrator.

bcdedit /displayorder {Boot ID} /remove

For example: bcdedit /displayorder {7f17102e-bc3b-11df-bd74-f9bb1d9e0438} /remove

*Tips taken from Windows 7 Resource Kit

Thursday, October 21, 2010

Best Practices for Creating a Secure Guest Account


In some environments, you might need to set up a Guest account that can be used by visitors. Most of the time, you’ll want to configure the Guest account on a specific computer or computers and carefully control how the account can be used. Here are some best practices to follow when creating a secure Guest account:

Enable the Guest account for use


By default, the Guest account is disabled, so you must enable it to make it available.

Go to Start | Right Click on Computer and Click on Manage

image

Now Expand Local Users and Groups and Select Users.

On your Right Side Pane you’ll find Guest. Double Click on Guest

image

Clear the Account Is Disabled check box. Click OK.

Set a secure password for the Guest account

By default, the Guest account has a blank password. To improve security on the computer, you should set a password for the account.

Right-click Guest, and then select Set Password.

image

Click Proceed at the warning prompt.

image

Type the new password and then confirm it. Click OK twice.

image

Ensure that the Guest account cannot be used over the network


The Guest account shouldn’t be accessible from other computers. If it is, users at another computer could log on over the network as a guest.

Go to Start under search  type secpol.msc 

image

Expand Local Policies Branch under that select User Rights Assignment

image

Double Click on Deny Access To This Computer From The Network

image

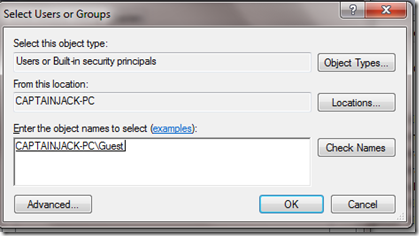
Click on Add User or Group and Type in Guest there and Click OK twice.

image


Prevent the Guest account from shutting down the computer


When a computer is shutting down or starting up, it is possible that a guest user (or anyone with local access) could gain unauthorized access to the computer. To help deter this, you should be sure that the Guest account doesn’t have the Shut Down The System user right.

Go to Start under search  type secpol.msc 

image

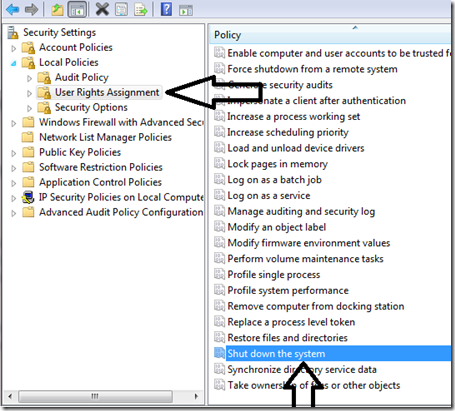
Expand Local Policies then expand User Rights Assignment

image

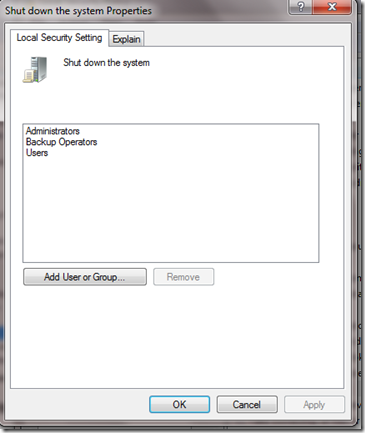
Make sure Shut Down The System policy doesn’t list the Guest account.

Prevent the Guest account from viewing event logs

To help maintain the security of the system, the Guest account shouldn’t be allowed to view the event logs.

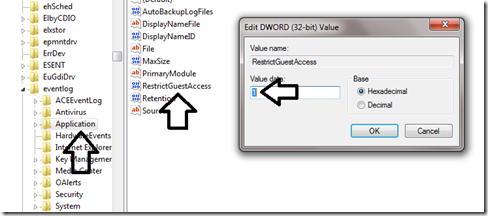
Go to Start under Search type in regedit then go to

HKEY_LOCAL_MACHINE\SYSTEM\CurrentControlSet\services\eventlog

Look for three important Registry Keys

  • Application
  • Security
  • System

image

Make sure each of these subkeys has a DWORD value named RestrictGuestAccess with a value of 1. To check that double click on RestrictGuestAccess 

Source: http://technet.microsoft.com/en-us/magazine/ff687018.aspx

Command-Line Switches for Disk Cleanup and How to Automatic Disk Cleanup


Disk Cleanup offers some cool command-line switches that are documented only in a pair of obscure Knowledge Base articles. Through the use of these switches, you can save your preferences and rerun the cleanup process automatically using those settings. To do so, you need to use the following switches with Cleanmgr.exe:

image

/Sageset:n Opens a dialog box that allows you to select Disk Cleanup options, creates a registry key that corresponds to the number you entered, and then saves your settings in that key. Enter a number from 0 through 65535 in place of n.

/Sagerun:n Retrieves the saved settings for the number you enter in place of n and then runs Disk Cleanup without requiring any interaction on your part.

To use these switches, follow these steps:

1. Open a Command Prompt window and type the command cleanmgr /sageset:200. (The number after the colon is completely arbitrary; you can choose any other number from 0 through 65535.) Note that you must supply credentials from a member of the Administrators group to begin this task.

image

2. In the Disk Cleanup Settings dialog box, choose the options you want to apply whenever you use these settings.

image

3. Click OK to save your changes in the registry.

Automatic Disk Cleanup:

1. Then go to Start under Search type in Task Scheduler

2. Start the Create Basic Task wizard.

image

3. Choose how often you want to run it

image

4. Then under Action select Start a Program

image

5. Under Program / Script type in  cleanmgr.exe and type /sagerun:200 in the Add Arguments box.

image

6. Then Click Next and Finish

Repeat steps 1–6 for other Disk Cleanup options that you want to automate.

What is Office 365?


image

Microsoft Office 365 delivers the power of cloud productivity to businesses of all sizes, helping to save time, money and free up valued resources. Office 365 combines the familiar Office desktop suite with cloud-based versions of our next-generation communications and collaboration services: Exchange Online, SharePoint Online and Lync Online.

Office 365 is simple to use and easy to administer – all backed by the robust security and financially-backed, guaranteed reliability you expect from a world-class service provider

image

According to Microsoft’s announcement this week, Office 365 will replace Office Live Small Business, Live@edu, and the company’s subscription-based messaging and collaboration product known as Microsoft Business Productivity Online Suite or BPOS.

Office 365 is more than a new brand,” Microsoft Office Division president Kurt DelBene said in a statement. “It’s a progressive approach to cloud applications. We designed Office 365 to work for a business of one - or a business of one million and one.”

Office 365 will let companies scale their infrastructure quickly. If, for instance, a business makes an acquisition, opens a new store or holds a holiday promotion, it will be able to rapidly expand its infrastructure in days, not months - while only using and paying for what’s needed. Some individuals will only have basic email, while others will have mobile applications, and others full versions of Exchange and SharePoint, based on the requirements of their roles.

The proposed pricing for small businesses - with 1 to 25 employees is $6 (or €5.25 or ¥600) per user per month, and enterprises pay between $2 and $27 per month per user, depending on the business' needs.

image

Microsoft said Office 365 will be available worldwide next year, and will expand to provide new services to new audiences. Later next year Microsoft said it will introduce Office 365 for education for students, faculty and school staff, and Dynamics CRM Online will join the Office 365 family of services next year, giving customers a even more complete business productivity experience.

Microsoft announced a limited Office 365 beta program with enrolment starting on October 19 at noon Pacific Time.

The company also said that it would offer Office 365 as a service that its technology partners can resell, and use to customize and enhance existing applications and services. “Partners are central to our strategy with Office 365,” Microsoft Office division senior vice president Chris Capossela said in a statement. “A vibrant partner community is critical to ensure our customers get the most from Office 365, and that’s why we’re investing deeply to provide partners with a clear path to success in the cloud.”


Key benefits

Anywhere-access to email, documents, contacts, and calendars on nearly any device*
Work seamlessly with Microsoft Office and the other programs your users already count on everyday
Business-class features including IT-level phone support, guaranteed 99.9% uptime, geo-redundancy, and disaster recovery
Pay-as-you-go pricing options which give you predictability and flexibility for all or part of your organization
Latest version of Business Productivity Online Suite (BPOS), which has millions of business users today

BatteryCare–Optimize the usage and performance of the modern laptop's battery


BatteryCare is a software created to optimize the usage and performance of the modern laptop's battery. It monitors the battery's discharge cycles and helps increasing it's autonomy and improving its lifetime.

BatteryCare allows you to have the control over the discharge cycles number, and when this reaches 30 (or other configured value), it notifies you that it's time to perform a full discharge in order to keep the battery gauge calibrated.
Like this, it's guaranteed to always have the correct capacity values reported by the battery.

Besides, when using the battery, there's the possibility to suspend some Operating System features that help degrading the autonomy (only in Windows Vista or higher):

- Windows Aero, the theme that allows for visual effects like window transparency, requires graphics card acceleration, which obviously will help decreasing the battery lifetime;

- SuperFetch, ReadyBoost and SearchIndexer are three Windows Vista (and higher) services that, even in battery mode, are using the hard disk a lot and increase total power consumption, thus decreasing battery lifetime. Suspending these services has absolutely no negative impact on the performance or security of the system.

These features are resumed once the laptop is plugged in to A/C power.

image

Main Features of Battery Care

Battery's discharge cycles monitoring: The advanced algorithm accurately records when a complete discharge cycle is performed. When the configured number of discharge cycles is reached, a notification balloon pops up to remind that a full discharge is required.

Complete battery information: It calculates the statistical remaining time in laptops that don't support the battery time left information and only list the charge percentage.Shows all the detailed information about the battery, such as wear level, capacities, consumption, manufacturer, etc.

CPU and HDD temperature reading: BatteryCare constantly monitors your CPU and hard drive temperature, either in degrees Celsius or Fahrenheit.


Automatic power plans switching: Depending on the power source of the computer, BatteryCare can automatically select the power plan you prefer.


Control over Windows Aero and demanding Services: Automatically disable the graphics accelerated theme in Windows Vista and/or demanding services that degrade battery lifetime.
Once the laptop stops running on batteries, the theme is re-enabled and the stopped services are restored.

Notification area information: It features a compact popup with the essential information you need to quickly monitor. Temperatures, charge status, remaining time and power plans

Lightweight in the system: Given the concern about the battery optimization, BatteryCare does not interfere with the system performance. It requires only a mere 0,1% of Processor and Memory resources.


Download: http://batterycare.net/en/download.html

Revo Uninstaller–Advance Removal of Programs


Revo Uninstaller is alternative of Windows Programs and Features. Most of the times the Programs Uninstaller leave of of junks registry keys and files. With its advanced and fast algorithm, Revo Uninstaller analyzes an application's data before uninstall and scans after you uninstall an application. After the program's regular uninstaller runs, you can remove additional unnecessary files, folders and registry keys that are usually left over on your computer. Even if you have a broken installation, Revo Uninstaller scans for an application's data on your hard disk drives and in the Windows registry and shows all found files, folders and registry keys so you can delete them.

After Installing Revo Uninstaller choose the program which is bothering you to uninstall ,and select it from the list included in Revo Uninstaller.

image

It’s perfectly Safe to use the Uninstaller because before it make any changes it creates a Full backup of the Registry and create a System restore point.

image

As you can see in the Picture it will give three scanning modes. Safe, Moderate and Advance. I mostly use advance since it want all the left over files out of my Computer.

Once it Full backup of the Registry and create a System restore point first it will attempt to use the Programs build-in uninstaller. Once that’s complete it’s will scan for left over files which you could delete them.

The Free edition is limited to 32-bit programs. If your purchasing the Pro edition you get 64-bit application features

The Browsers Cleaner feature lets you clear out your browsing history, cookies, temp files and more from different web browsers installed on the computer.

image

Microsoft Office Cleaner allows you to clean out recent document history for versions 2000 through 2007.

image

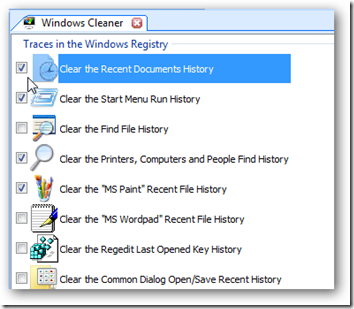
Windows Cleaner let’s you clean up temp files, document history, the recycle bin, and more unnecessary files that Windows saves so you can reclaim disk space.

image

The user interface has been redone and includes tabbed features and an easy to use search that lets you find the app you want to remove more quickly.

image

You can pickup the Tools Toolbar and move it around to anywhere you want within the app.

image

It still includes the same favorite features like Hunter Mode.

image


Main Features of Revo Uninstaller Pro

  • Real-Time installation monitor - for complete uninstall
  • Forced Uninstall - remove stubborn programs
  • Advanced scanning for leftovers - remove remnants of programs
  • Multi-Level Backup System - safe uninstall of programs
  • Junk Files Cleaner - remove unnecessary files
  • Autorun Manager - control Windows startup
  • Windows Tools - useful Windows tools in one place
  • Browsers Cleaner - clear Internet browser history
  • MS Office Cleaner - clear Microsoft Office history
  • Windows Cleaner - remove junk files from your Windows
  • Evidence Remover - erase permanently confidential data
  • Unrecoverable Delete - erase permanently files and folders
  • Full 64-bit compatibility - native support of 64-bit OSs

Free edition is enough for 32 Bit user but if your using 64-bit edition of Windows then you might want to think about Pro edition.

Download Nowimage

Wednesday, October 20, 2010

Windows Defender from the Command Line


There are few command lines for Windows Defender

The basic usage at the command prompt is:  MpCmdRun.exe [command] [-options]

You have to elevate the command prompt to run these commands i.e.

Start | CMD | Right Click and Run as administrator |

Then we have to navigate to the Root directory i.e.

cd Program Files\Windows Defender\

image

Command    Description
-Trace [-Grouping #] [-Level #] Starts diagnostic tracing
-RemoveDefinitions [-All] Restores the installed signature definitions to a previous backup copy or to the original default set of signatures
-Scan [-ScanType] Scans for malicious software
-SignatureUpdate Checks for new definition updates
-GetFiles Collects support information
-RestoreDefaults Resets the registry values for Windows Defender settings to known good defaults

Tip by Matthew Graven, TechNet Tips Editor